XiZi's Blog
Executing System Couplings Using the Command Line
To do this you’ll be running from the command line. Some details are in the Workbench documentation ( // System Coupling User’s Guide // Workflows for System Coupling // Executing System Couplings Using the Command Line) but I’ll provide more details here. I’ll assume you’re on Windows for now.
1. Create the MAPDL db file, Fluent cas file and System Coupling sci file. Creating the sci file is described in the documentation link above.
2. Create a simple Fluent journal file that starts Fluent in batch, reads the cas file and solves.
3. Create a simple MAPDL solver input file that resumes from the db file and solves.
4. Start the coupling service:
set PATH=%AWP_ROOT140%FrameworkbinWin64;%PATH%
“C:\Program Files\ANSYS Inc\v140\aisol\bin\winx64\Ansys.Services.SystemCoupling.exe” -inputFile -coupling.sci
5. Note the port and hostname in the scServer.scs file that gets created.
6. Starts the Fluent solver, e.g:
“C:\Program Files\ANSYS Inc\v140\fluent\ntbin\win64\fluent.exe” 3ddp -hidden
-driver null -scport=12345 –schost=hostname -scname=”Solution“ -i fluidflow.jou > FLUENT.out
rc "FFF-1.cas"
/file/auto-save/df 10
/file/auto-save/rn "FFF-1.gz"
/solve/set/ts 0.001
/solve/set/nots 100000
/solve/initialize/hyb-initialization
(sc-solve)
/exit
7. Start the MAPDL solver, e.g:
“C:\Program Files\ANSYS Incv\140\ansys\bin\winx64\ANSYS140.exe” -b -scport 12345 -schost hostname -scname “Solution 1″ -i structural.dat -o ANSYS.out
PS:
Here is a batch file which can run above process sequensly.
@echo off
setlocal enabledelayedexpansion

del "scServer.scs" 2>nul
start /b Ansys.Services.SystemCoupling.exe -inputFile sc.sci

:WAIT_SCSERVER
if not exist "scServer.scs" (ping -n 1 127.0.0.10 2>nul 1>nul && goto WAIT_SCSERVER)

Set /p scinfo=<"scServer.scs"
if "%scinfo%"=="" goto WAIT_SCSERVER

for /f "tokens=1,2 delims=@" %%i in ("%scinfo%") do (
set SCPORT=%%i
set SCHOST=%%j
)

if !SCPORT!=="" goto WAIT_SCSERVER
if !SCHOST!=="" goto WAIT_SCSERVER

echo %SCHOST% %SCPORT%
call "C:\Program Files (x86)\Microsoft Visual Studio 10.0\VC\vcvarsall.bat" amd64
REM start /b ANSYS145.exe -dis -mpi intelmpi -np 4 -b -scport !SCPORT! -schost !SCHOST! -scname "Solution 1" -i structural.dat -o ANSYS.out
start /b ANSYS145.exe -b -scport !SCPORT! -schost !SCHOST! -scname "Solution 1" -i structural.dat -o ANSYS.out -np 6
start /b fluent.exe 3ddp -t4 -scport=!SCPORT! -schost=!SCHOST! -scname="Solution" -i fj.jou -wait > FLUENT.out
goto :eof
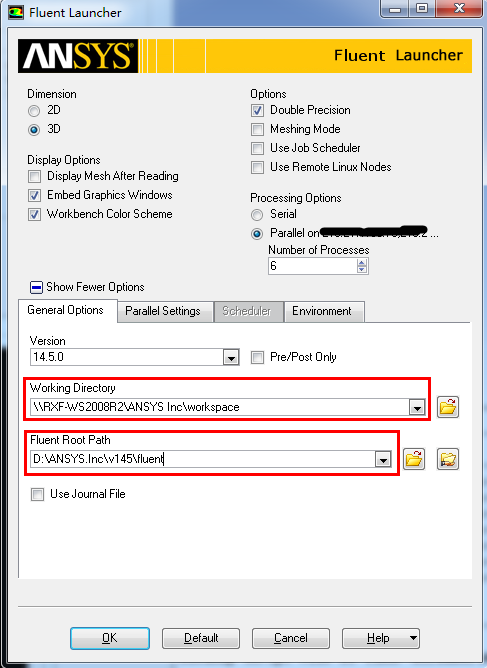
Windows系统下的ANSYS Fluent多机并行配置要点。
1.在每台机上上相同的目录安装ANSYS,这里假设为:D:\ANSYS.INC
2.在设置共享,我们共享计算实例所处的文件夹为workspace:这里为:\\RXF-WS2008R2\ANSYS Inc\workspace
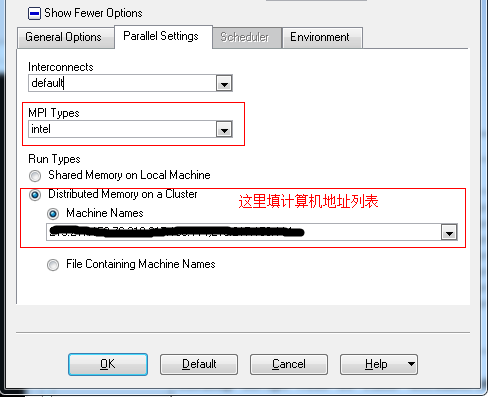
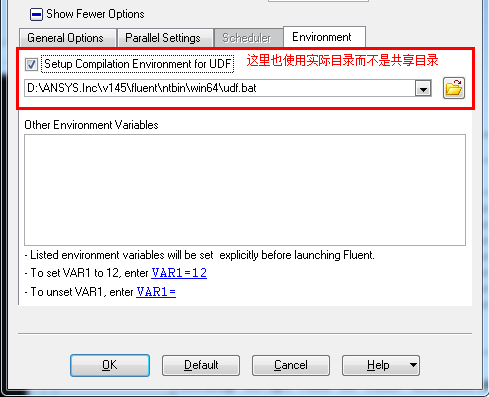
3.启动fluent.exe,配置如图